April 25, 2026 Updates
New Features
Remote Vital Visibility Controls
We’ve moved the Display Settings away from the student monitor and placed full control exactly where it belongs: with the instructor. This update allows for a more "organic" simulation experience where vitals are only revealed as students perform the necessary clinical interventions.
New Features
Real-Time Controller Toggles: Each vital sign on the Control Vitals page now features an individual toggle.
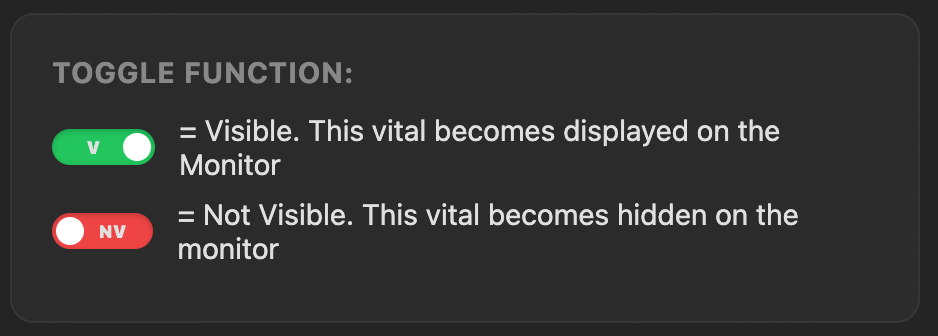
V (Visible): The toggle turns Green, and the vital appears on all connected student monitors instantly.
NV (Not Visible): The toggle turns Red, and the vital is hidden from the student view.
Instant Updates: Toggle changes are pushed in real-time. There is no need to click the "Apply New Vitals" button to hide or show a parameter.
Master Visibility Toggle: A "Global" toggle at the top of the vitals list allows instructors to show or hide all parameters simultaneously with a single click.
Student View Indicators: When a vital is hidden, a small red dot appears in the upper right-hand corner of the monitor tile to indicate the sensor is "off." This dot turns green once the vital is toggled on.
How to Use the Visibility Controls
Scenario Setup: Before the students enter the room, use the Master Toggle on the controller to set all vitals to NV. This creates a "blank" monitor, simulating a patient who has not yet been hooked up to equipment.
Revealing Vitals: As students apply leads or sensors (e.g., placing a pulse oximeter), click the toggle next to the corresponding vital (e.g., SpO2 and Pulse Rate).
Dynamic Assessment: If a student removes a lead or a sensor falls off during the simulation, toggle that vital to NV to prompt the students to troubleshoot their equipment.
Waveforms Identification Practice: Use the dedicated ECG Toggle to display the cardiac rhythm independently of the numerical heart rate value to test the students' rhythm recognition skills.
Note: When creating a new session, the system defaults to ON (V) with red status indicators, allowing you to build the clinical picture from scratch every time.
AED Training Simulator
We are excited to announce the release of the AED Training Simulator, a comprehensive update designed to provide students with a realistic, high-stakes environment for practicing cardiac emergency response.
New Features
Integrated Student View: The AED Simulator is now located directly on the Display Monitor Page, ensuring students can interact with it in their primary training view.
Automated CPR Clock: Once a shock is delivered, a 2:00 CPR countdown begins automatically.
Metronome: A 110 BPM metronome click plays throughout the CPR cycle to guide chest compressions.
Mute Toggle: An audio icon has been added to the AED display to mute the CPR metronome if necessary.
Auto-Analysis: At the end of the 2-minute cycle, the system triggers an "Analyzing patient" alert (audio and visual).
Smart Shock Logic: * Energy is fixed at 200 J (standard AED protocol).
If a shockable rhythm is detected, the system charges for 7 seconds, then repeats the prompt: "Shock Ready, press flashing red button, do not touch the patient" until the shock is delivered.
Instructor Shock Outcomes: Instructors can now pre-determine the result of a shock via a new dropdown on the controller. Options include:
No Effect
V-Tach
V-Fib
Asystole
Normal Sinus
Sinus Tachycardia
How to Use the AED Simulator
Initiate Training: Launch the Display Monitor for the student and the Control Vitals page for the instructor.
Enable AED Mode: On the controller, navigate to the AED section and toggle the simulator ON.
Set the Outcome: Use the Shock Outcome dropdown to select what rhythm the patient will convert to after the student delivers a shock.
Analyze & Shock:
The student clicks Analyze on the monitor.
If the current rhythm is shockable (e.g., V-Fib), the AED will prompt the student to clear the patient and deliver the shock.
Perform CPR: After the shock, the CPR Clock and metronome will start. The instructor does not need to reset the clock; it will run for the full 2 minutes regardless of any rhythm changes made on the backend.
Reset: To restart the simulation from the beginning, use the Reset Monitor AED button on the controller.
Smart Session Persistence
We’ve introduced Cookie Controls to improve how the app handles browser restarts and inactivity. The platform now remembers your last session ID across tabs and window closures, but will intelligently prompt you with a choice—"Continue Previous Session" or "Start New Session"—after 60 minutes of inactivity to ensure you don't accidentally join an outdated simulation.
Improvements
Button UI Labeling & Color Updates
We have updated the instructor dashboard with more intuitive button labels and a clear color-coded system to improve navigation speed and prevent accidental resets during live sessions.
Key Changes
Updated Button Text:
“Apply New Settings” is now “Apply New Vitals”
“Reset to Default” is now “Reset to Default Vitals”
“Display Monitor” is now “Go to Display Monitor”
Enhanced Visual Logic:
Action (Bright Green): The “Apply New Vitals” button is now bright green to clearly highlight the primary action for pushing data to students.
Navigation (Blue): The “Go to Display Monitor” button is now blue to distinguish screen navigation from data controls.
Warning (Red): Critical actions like “Reset AED” and “Reset to Default Vitals” remain red to indicate high-impact changes.
These updates are live across both Desktop and Mobile views to ensure a consistent experience regardless of which device you use to control your simulation.
Display Monitor Toggle
We have streamlined the instructor dashboard to give you more precise control over what students see on their monitors, allowing for a seamless transition between full vitals monitoring and dedicated AED training.
Key Updates
Master Display Monitor Toggle: A new "Display Monitor" toggle allows you to hide the entire vitals suite (ECG, SpO2, EtCO2, BP, Temp, and Glucose) with one click. This is perfect for scenarios where students must first "power on" the monitor or when you want to use the screen exclusively as an AED Trainer.
Simplified Rhythm Identification: The rhythm naming toggle has been updated to a simple ON/OFF switch.
ON: The rhythm name is visible to students.
OFF: The rhythm name is hidden, forcing students to interpret the waveform manually.
Interactive Tooltips: We’ve replaced bulky on-screen help text with sleek Information Icons (i).
Desktop: Hover over the icon to see the function description.
Mobile: Tap the icon to view guidance.
Optimized Layout: Controls are now grouped into a single row on desktop and a compact grid on mobile to save space and reduce scrolling during high-speed simulations.
Refined Reset Action: The "Reset AED" button has been relocated to the bottom of the control section and its label shortened for better clarity on smaller screens.
Quick Tip
By toggling the Display Monitor to OFF and the AED Trainer to ON, you can instantly convert the student station into a standalone AED training unit.
Bug Fixes
SpO2 Waveform Alignment
Fixed a visual issue where the SpO2 flatline was center-justified when the value dropped to 0%. The waveform now correctly justifies to the bottom of the display section, providing a more accurate and clinically realistic representation of a lost signal or pulseless state.